Montessori at Home: Being a Nature Ranger
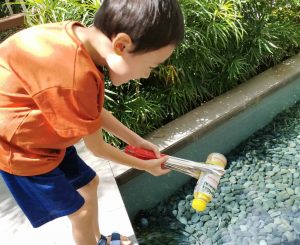
One of the greatest challenges facing our children is the impact of environmental damage. It is good to inculcate a knowledge of being respectful of Mother Nature, taking care of our environment, and reinforcing sustainability and not being wasteful. Spending time in nature helps children to form a bond, and hopefully will create a sense of responsibility, caring and need to protect. Nature is a place where all of children’s senses are activated and directly engaged. Dr. Maria Montessori believed that nature can release children to achieve their fullest potential by strengthening their motor skills, socioemotional development, cognitive development and even their sensory perception. “When children come into contact with nature, they reveal their strength.” – Dr. Maria Montessori Other benefits of being in nature include: Good for mental health Increase in attention span Increased freedom leading to greater independence Greater empathy (e.g. taking more care of other living things and their environment) For our House on the Hill Children’s Day Celebration 2022, the children became Nature Rangers and explored 4 different elements to find our furry friend, Browny the Bear. Everybody enjoyed themselves tremendously and it was a wonderful way to get out of the classroom and learn outdoors. Many of the activities asked the children to consider the environment and what they can do to protect the earth. For this Montessori at Home, we are extending this exercise outside of school. Getting outdoors and looking out for items that should not be there, e.g. litter, offers opportunities for children to get the benefits of learning outdoors, whilst also reinforcing in a concrete manner, how they can contribute towards caring for our planet. Nature Rangers Transform! Let’s go to the park! Activity Notes: Attire: Nature Ranger costume or Outdoor attire Bring along your binoculars/hat/hiking gears/insect box too if you can! Equipment required: Plastic bag, gloves, pair of tongs Time: Preferably in the morning or later in the afternoon, when the heat is not at its strongest Step 1: Bring your child out to a nearby park When you and your child are at the park, explain that you are going to have your very own exciting adventure as Nature Rangers. For instance, you can have one or two missions that leads you to the last activity or destination of the park. You can even design a map to make it fun and exciting! Step 2: Check out the surroundings and pick up any rubbish on the ground While walking around the park, pay attention to the surrounding and see if there is any litter around. Encourage your child to collect any that can be seen. You can even bring along a pair of tongs and a trash bag for your child to use. After you have finished collecting the litter, guide your child to the nearest rubbish bin to dispose. Step 3: Have a discussion with your child. Topics that you can bring up during your walk: Recycling Recycling is when a used item is reformed into a new material (like metal, plastic, paper or glass). We should make use of our day-to-day opportunities to cultivate a habit of recycling and share the responsibility of recycling with our children. Here is an informative video made by the National Environment Agency (NEA) that shows how recyclables are handled after we throw the items into the recycling bins, as well as things we should not dispose together with recyclable items (e.g., food and liquid waste, tissue paper or diapers). Additionally, the NEA website is full of helpful information about how Singapore manages waste – and how you can help! Pollution Pollution is another interesting topic that will invite your child to be curious about the environment around them. We want to instill a love and care for the environment in the children. This means that we: Keep the parks clean and litter-free Throw away litter in the dustbin Categorize our recyclable litters into the recyclable bins Engage respectfully with nature You may also share with your child what happens if these are not done properly. The effect of improper removal of rubbish can lead to soil/air/water contamination, cause death to animals and marine life, and damage to our planet. Step 4: Have a little fun in the park! Create a little competition of who has collected more litter at the end Fly a kite and enjoy the breeze in the park Look out for any little creatures and use your insect box to catch them. (Please do release the insects back to nature after observing them)