Isn’t time just flying by? It will be the end of the year soon! As we welcome the month of November in a few days’ time, some of us will be preparing to celebrate a festival that will be taking place too. Can you guess what festival this is? Clue: It is also known as the Festival of Lights!
Did you guess Deepavali? That is correct! In the first week of November, we will be observing an important festival celebrated by Hindus, Sikhs and Jains around the world – Deepavali, also known as the Festival of Lights or Diwali.
At House on the Hill, we will be sharing on how it is celebrated around the world and in Singapore. Preparations for Diwali begin long before the actual day – homes are cleaned, new traditional clothes are purchased, sweet and savoury snacks are prepared, oil lamps are lit and doorways are decorated with beautiful intricate patterns (Rangoli) using coloured rice powder or rice! Rangoli is commonly seen in this festival to welcome blessing into the households. It also signifies happiness and positivity. On the actual day, families visit the temples for ceremonies and lighting of candles before visiting their relatives and friends with good wishes and blessings!
One of the ways we help the children to learn about the festival is to engage in fun craft activities together. As we sit together to make this craft, we can discuss the festival at the same time. It is a wonderful way for the children to experience and understand the significance of the celebration. This month for Montessori at Home, we will be trying a rangoli craft activity!
This craft activity utilises cutting and will help to develop your child’s fine motor skills. Exploring different types of art medium such as chalk allows children to build on their creativity and imagination.
The materials for rangoli craft are simple and easy to find – a pair of scissors, squared paper (or reuse any paper with a blank surface that you don’t want), different coloured chalks.
Rangoli Craft
Materials Needed
A pair of scissors
Squared paper (or reuse any paper with a blank surface that you don’t want)
Different coloured chalks.
Steps:
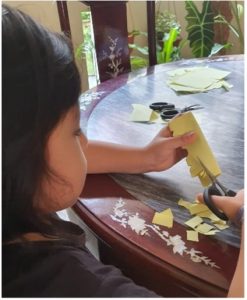
Step 1. Fold the paper into half and cut along the sides of the paper. Let your child be as creative as they want! They can cut straight, wavy, zigzag or curved long/short lines.
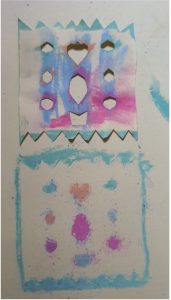
Step 2. Time to unfold and be amazed at the design that they have made!
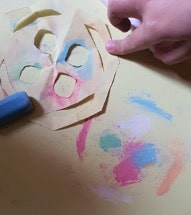
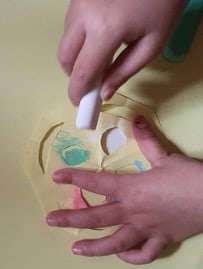
Step 3. Using a chalk, colour the spaces in between the design to imprint it onto another piece of paper
Step 4. Voila! Here’s your beautiful print! This is a good time to have a discussion about the craftwork and the design with them as well.
Discussion with your child about their craftwork enhances their self-confidence. Children find intrinsic joy in their work and will feel a sense of accomplishment upon completion of a task. Don’t hesitate to ask questions to give your child an idea of what to share if they are reserved and unsure of what to talk about. Just a gentle reminder not to overwhelm and force your child to share if they are not ready to. Remember, it’s all about having fun and bonding with your child!
For a refresher on why we use term of encouragement rather than praise, click here!